

Before proceeding it's a good idea to save your work with a different filename just for insurance (File | Save As...). If an error is made later in the process you can return here without having to go through the alignment process again. If you have acquired a good set of images and done a good job on the alignment you probably are not noticing many seams. If you do happen to notice a few seams take heart as these are easily hidden using a simple technique.
First you should evaluate the overall brightness levels. Does it look like a particular segment stands out as too bright or too dark compared to those around it? If so, select that layer and adjust the brightness and contrast to bring it in line with its neighbors (Image | Adjust | Brightness/Contrast). If it looks like you are able to fix one part of the segment, but another portion is incorrect, use the Lasso tool and select the offending portion, feather it a generous amount (Select | Feather...), and adjust the brightness and contrast of that portion by itself. With enough tweaking you should be able to achieve a perfect blend.
It should be pointed out that if you are using a CCD camera and have properly calibrated your images and normalized the histograms as noted earlier, you should not have to adjust the brightness of any of your segments. You may, however, have a few minor alignment problems to clean up. This is done by using the Eraser tool with a fairly large radius and soft brush to erase the edge of each of the overlapped image layers. This will soften the edges and blend the layers nicely. But how can we see this edge to erase it?
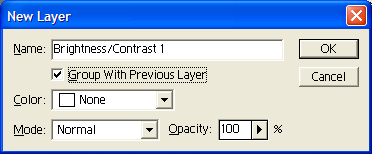
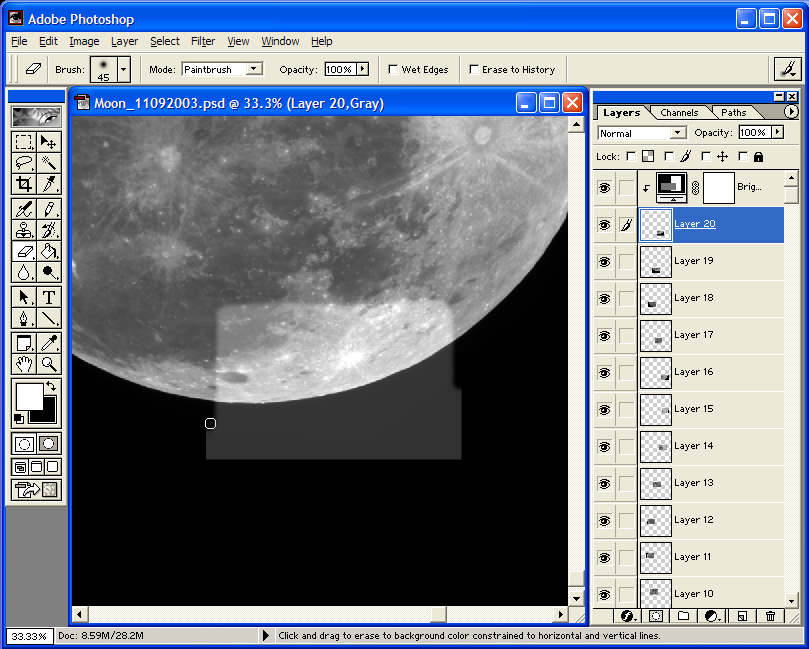
Here's the trick. Select the top layer. Add an Adjustment Layer for Brightness and Contrast (Layer | New Adjustment Layer | Brightness/Contrast...). Be sure to choose "Group With Previous Layer" (see Figure 4). Increase the brightness of this layer by about 50% (see Figure 5). Don't worry about how the image looks; we're going to delete this layer in a moment anyway. What this layer does is show us the image segment's edges. Use the Eraser tool with a soft brush and fairly decent size radius. For starters, try a radius of 45. Select the layer with the image segment. It will be the layer just below the adjustment layer we just added. Note that Photoshop will leave the adjustment layer selected by default so don't forget this step! Carefully erase the edge that overlaps the image below. You'll see the edge softening as you erase. That's the effect we're after (see Figure 6). Take care to only erase the edge. Do not penetrate too far into the image or you could erase too much. You need not soften the edges that extend out into the black sky. When you are happy with the result, delete the adjustment layer...it has served its purpose. Be sure the adjustment layer is selected, and then delete the layer (Layer | Delete Layer).
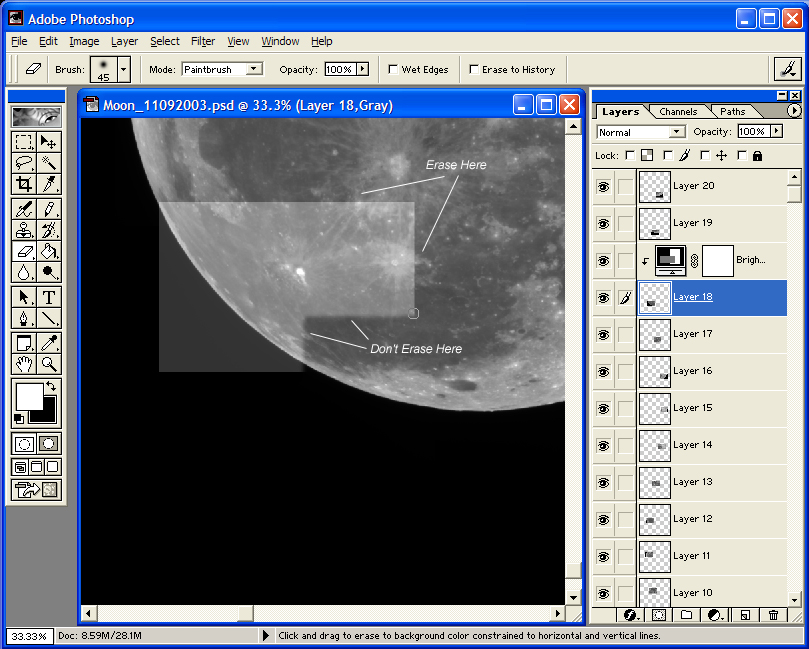
Repeat this procedure with the remaining layers. You will notice as you work your way down that the adjustment layer will show you hard edges and soft edges (see Figure 7). The soft edges are edges you have already softened in the layers above. These do not require erasing. Doing so may result in eliminating image data. Only erase the hard edges! If at any time you see a completely black area as the result of your erasing it means you have erased too much data. Use undo immediately (Edit | Undo)! You will notice when you get to the bottom image segment that it has no hard edges. That's because in a perfectly overlapped mosaic the bottom image segment has no internal edges visible from the top and thus will not need any softening. Save off a copy of the layer stack at this point. Now flatten the image and save again with a unique filename.

Figure 4. Adding a Brightness/Contrast Adjustment Layer makes it easy to see the image segment’s edges. Be sure to check "Group With Previous Layer".

Figure 5. Adjust the Brightness up by 50 percent. Notice how this shows us the edges of the image segment.

Figure 6. Use the Eraser tool with a soft brush to soften the edges. Be sure to select the image layer before erasing and don’t erase too much!

Figure 7. When softening edges in lower layers, be sure to erase only the hard edges. If you start to see the black canvas underneath, undo immediately!
<PREVIOUS SECTION> <MAIN> <NEXT SECTION>