

If you take multiple images of each segment, you can either combine these images or just select the crispest image of the series. The decision should be based on the signal-to-noise ratio of the image set. If you image with a CCD camera that is thermoelectrically cooled and have properly collected ample dark and flat frames, you can probably get away with using a single image for each segment. Otherwise, you may need to align and combine your images to get a reasonably good signal-to-noise ratio. A high signal-to-noise ratio will allow more aggressive sharpening to the completed mosaic and will also result in a more natural blending of individual segments.
After you have processed the images for each segment down to a single image the next step is to normalize the histograms for the image set. The goal here is to set the dark point and white point in exactly the same spot for each image segment. In other words, we want to determine a common dark point and white point such that the image is not clipped on either the dark or the light end of the histogram for any image in the set. If you are unfamiliar with some of this terminology, perhaps some definitions will help. The image histogram is a representation of the number of pixels in an image for a given brightness value range. For example, in Software Bisque’s CCDSoft program, select the image and press Ctrl-H to display the histogram. The Dark Point is the point in the histogram below which all pixel values are displayed as pure black and conversely the White Point is the point in the histogram above which all pixel values are displayed as pure white. Any image data below the black point or above the white point is lost since it is rendered as pure black or pure white. This is called clipping and is perhaps the most misunderstood and abused aspect of digital image processing.
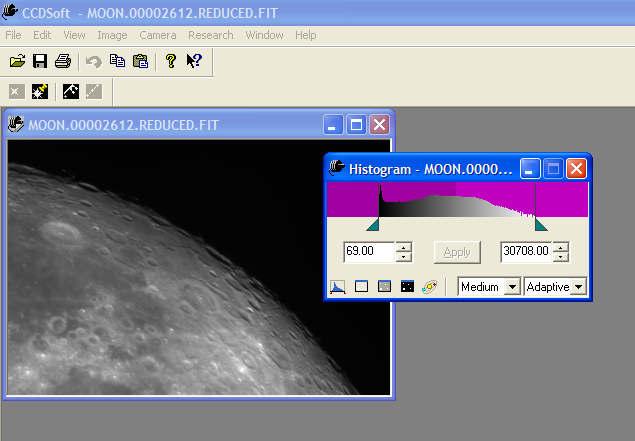
Since we are dealing with multiple image segments we want to be sure that the histogram of the combined mosaic is not clipped on either end. The first step is to set the dark point and white point for each individual segment such that the image histogram is not clipped (see Figure 1). Then tab through each image and take note of the lowest black point and the highest white point values. The minimum black point and maximum white point will most likely not be from the same image segment. Now go back through the all the images and set each image's black point to the minimum value and the white point to the maximum value. Don't become too concerned if the images start looking too bright or too dark. What you are doing with this process is capturing the mosaic's total tonal dynamic range. You may be surprised in the end just how much real information is hidden in all those individual segments! As a final step save the image segments in TIFF format.
Normalizing the histograms is a vital step and is perhaps one that many imagers constructing mosaics overlook. Failure to properly execute this step may result in some areas of the finished mosaic to be burned out and other faint areas to be lost into the darkness. Once the information is clipped it can never be retrieved, so be careful!

Figure 1. Adjust the histogram for each image segment so that image data is not clipped on either end. As you do this take note of the smallest dark point value and highest white point value. Set the histogram of all image segments to these two values so that the resultant mosaic will not be clipped on either end.
<PREVIOUS SECTION> <MAIN> <NEXT SECTION>